Top 6 Adhesives in Woodworking

In woodworking, there’s always more than one way to skin a cat. With so many adhesives on the market, choosing the adhesive that will work for your project can be a difficult decision. So in this blog i will explain to you the adhesives that are commonly used in woodworking, each with their own unique properties and advantages. Each type of adhesive has its own unique properties and advantages, so it is important to choose the right one for the job.

Man applying glue to wood and gluing boards in carpentry workshop

Here are some of the most common types:

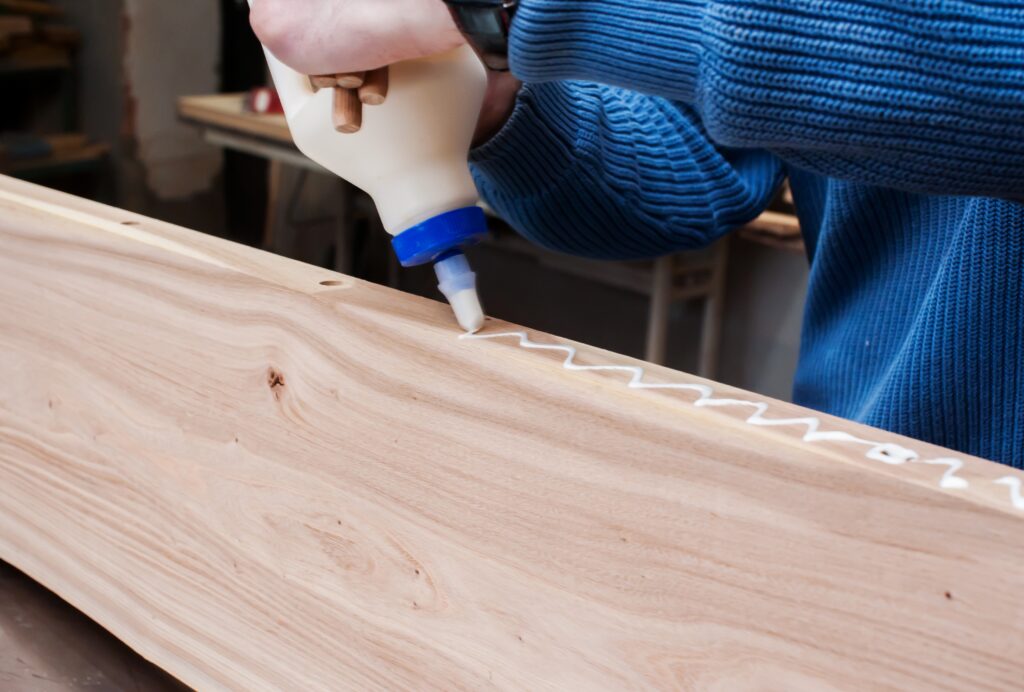
  1. PVA (Polyvinyl Acetate) Glue: This is the most commonly used woodworking glue because of its ease of use, affordability, and versatility. PVA glue is a water-based adhesive that is easy to use and dries clear. It is particularly effective for joining porous materials, such as wood, and can be used on a variety of wood surfaces. PVA glue is also easy to sand once it has dried, making it ideal for projects that require a smooth finish. However, PVA glue is not waterproof and may not be suitable for outdoor projects
  2. Epoxy: Epoxy is a two-part adhesive that provides a very strong bond. It consists of a resin and a hardener, which are mixed together before application. Epoxy can be used on a variety of surfaces, including wood, metal, and plastic, and is particularly useful for bonding wood to non-porous materials. Epoxy takes longer to cure than other adhesives, but it provides a very strong and durable bond that can withstand heavy loads and exposure to moisture.
  3. Cyanoacrylate (CA) Glue: Also known as super glue, CA glue is a fast-drying adhesive that provides a strong bond. It is useful for small repairs and for bonding wood to non-porous materials, such as metal or plastic. CA glue dries clear and is ideal for projects where appearance is important. However, it is not effective for bonding porous materials, such as wood, as it tends to be brittle and can break easily.
  4. Hide Glue: Hide glue is a natural adhesive that has been used in woodworking for centuries. It is made from animal collagen and is particularly useful for repairing antique furniture. Hide glue is reversible, meaning that it can be heated and reactivated if necessary. It is also great for use in veneering, as it provides a strong and stable bond. Hide glue has a longer working time than other adhesives.
  5. Polyurethane Glue: Polyurethane glue is a very strong adhesive that provides a waterproof bond. It is particularly useful for outdoor woodworking projects or for bonding wood to non-porous materials.
  6. Contact Cement: Contact cement is a strong adhesive that is particularly useful for laminating wood surfaces together. It is also useful for bonding wood to non-porous materials, such as metal or plastic.

Is it better to sand by hand or with a power sander?

Whether it’s better to sand by hand or with a power sander depends on the project and personal preference. Here are some Pros and Cons of each method:

Sanding by hand:

  • Pros: Sanding by hand allows you to have more control over the sanding process, which is important for delicate or intricate projects. It also allows you to sand curved or irregular surfaces more easily.
  • Cons: Sanding by hand can be time-consuming and tiring, especially for larger projects. It can also be difficult to achieve a consistent finish with hand sanding.
women using an orbital sander in a shop
woman using an orbital sander in a work shop

Using a power sander:

  • Pros: Power sanders are much faster than sanding by hand and can be used to cover large areas quickly. They also help achieve a more consistent finish.
  • Cons: Power sanders can be too aggressive and may remove too much material if not used properly. They can also create more dust that needs to be cleaned up afterward.

In general, for larger projects or tasks that require a lot of material to be removed, using a power sander is often more efficient. However, for smaller or more delicate projects, sanding by hand may be the better choice. It’s important to choose the right tool for the job and use it properly to achieve the best results.

What is the best sandpaper for woodworkers?

Sanding a wood surface with orbital sander in a workshop

The best sandpaper for woodworkers depends on the task at hand. Here are some general guidelines:

  1. Grit: The grit of the sandpaper refers to the size of the abrasive particles on the paper. The higher the grit number, the finer the sandpaper. For most woodworking tasks, you’ll want to use a range of grits, from coarse to fine. For example, you might start with a 60-grit sandpaper to remove rough spots, then move to a 120-grit paper for smoothing, and finish with a 220-grit paper for a final sanding.
  2. Type: There are two main types of sandpaper: open-coat and closed-coat. Open-coat sandpaper has larger gaps between the abrasive particles, which makes it less likely to clog with sawdust. This type of sandpaper is good for rough sanding tasks. Closed-coat sandpaper has a denser pattern of abrasive particles, which makes it better for fine sanding tasks.
  3. Material: Sandpaper can be made from a variety of materials, including aluminum oxide, silicon carbide, and zirconia alumina. Aluminum oxide is the most common material and is suitable for most woodworking tasks. Silicon carbide is harder and more durable, making it better for sanding harder materials like metal or glass. Zirconia alumina is the most durable material and is best for heavy-duty sanding tasks.

In summary, the best sandpaper for woodworkers depends on the specific task at hand. It’s always a good idea to have a range of grits and types of sandpaper on hand to tackle different projects.

What are the 3 common sanding grits used in woodworking?

Sanding is an essential part of woodworking, as it helps to smooth out rough surfaces and prepare wood for staining, painting, or finishing. However, with so many different types of sandpaper available, it can be challenging to know which grits to use for each stage of sanding. In this blog, we’ll look at the three common sandpaper sanding grits used in woodworking and when to use them.

hand sanding wood
hand sanding wood
  1. Coarse Grits (40-60 grit)

Coarse grits are typically used for the initial sanding of rough wood surfaces. They are the most abrasive type of sandpaper and are used to remove large amounts of material quickly. Coarse grits are also used to remove old paint or varnish from wood surfaces. The most common coarse grits are 40-60 grit sandpapers.

When using coarse grits, it’s essential to be careful not to over-sand the wood, as this can cause damage to the surface. It’s also important to sand with the grain of the wood to avoid creating scratches or gouges.

  1. Medium Grits (80-120 grit)

Medium grits are the next step up from coarse grits and are typically used to smooth out rough surfaces after the initial sanding. Medium grits are less abrasive than coarse grits and are used to remove smaller imperfections in the wood surface. The most common medium grits are 80-120 grit sandpapers.

When using medium grits, it’s important to keep the sandpaper flat on the surface and to sand with the grain of the wood. Sanding against the grain can cause scratches and other damage to the wood surface.

  1. Fine Grits (150-220 grit)

Fine grits are the least abrasive type of sandpaper and are used for the final sanding of wood surfaces. Fine grits are used to smooth out any remaining imperfections and to create a smooth, even surface for finishing.

What abrasive materials are used for wood sanding?

There are several types of abrasive materials used for wood sanding such as sandpaper, abrasive pads, steel wool, sanding sponges and the list goes on.

sanding wood with sandpaper

Let’s dive into the most popular abrasive materials for the woodworking industry!

  1. Sandpaper: This is the most common type of abrasive material used for wood sanding. Sandpaper comes in different grits, ranging from coarse to fine. The coarse grits are used for removing heavy material, while the finer grits are used for smoothing and finishing.
    • Abrasive pads: These are made of synthetic materials and are used for finishing wood surfaces. They come in different shapes and sizes and can be used by hand or with power tools.
    • Steel wool: This is a fine abrasive material made of steel fibers. It is used for smoothing and finishing wood surfaces.
    • Sanding sponges: These are flexible foam blocks coated with abrasive material. They are used for sanding curved or irregular surfaces.
    • Emery cloth: This is a type of sandpaper that is coated with abrasive particles of aluminum oxide or silicon carbide. It is used for heavy-duty sanding and removing rust from wood surfaces.
    • Diamond abrasives: These are abrasive materials made of industrial-grade diamonds. They are used for sanding and polishing hard wood surfaces, such as hardwood floors.

    The choice of abrasive material depends on the type of wood, the desired finish, and the level of sanding required.

    Woodworking Valentine’s Day Gift Ideas

    Valentine’s Day is officially less than a month away! This special day is a time to show love and appreciation to the special people in our lives. For many, this means buying flowers, chocolates, and other traditional gifts. But for woodworkers, there’s nothing quite like the satisfaction of creating something special with our own two hands.

    Woodworking Valentine's Day Gift Ideas- Wooden Hearts for Valentine's Day
    Wooden Hearts for Valentine’s Day – Woodworking Valentine’s Day Gift Ideas

    Whether you’re a seasoned pro or just starting out, woodworking can be a great way to express your love and creativity on Valentine’s Day. Here are a few ideas to get you started:

    1. Make a wooden keepsake. If you’re looking for a unique and meaningful gift, consider making a wooden keepsake. This could be anything from a wooden picture frame to hold a special photo, to a wooden jewelry box to store a loved one’s treasures.
    2. Build a piece of furniture. If you’re feeling ambitious, why not tackle a bigger project like building a piece of furniture? This could be anything from a coffee table to a rocking chair. Not only will you have a beautiful piece to show for your efforts, but you’ll also have the satisfaction of knowing that you created something that will be used and appreciated for years to come.
    3. Create a wooden card. For a simpler but still thoughtful option, you can make a wooden card. You can use a variety of techniques and materials like wood burning, wood carving or laser cutting to create a unique design. Or just keep it simple and use a piano hinge to connect 2 pieces of wood together and write your message inside!
    4. Make a wooden puzzle. Another fun and creative idea is to make a wooden puzzle. This could be a jigsaw puzzle, a brain teaser, or even a custom-made game. It’s a great way to spend quality time together while also giving a thoughtful and unique gift.
    5. Go on a woodworking date. Instead of a traditional dinner and a movie, why not plan a woodworking-themed date? This could be anything from a trip to a local woodworking store to pick out materials, to a class or workshop to learn a new technique.

    Whatever you decide to do, remember that the most important thing is to have fun and enjoy the process of creating something for someone to cherrish. Happy EARLY Valentine’s Day!

    How Will AI Change Woodworking in the Future

    Artificial intelligence (AI) is rapidly changing many industries, and woodworking is no exception. With the help of AI-powered technology, woodworkers are able to accomplish tasks more efficiently, accurately, and safely.

    One of the many ways AI is impacting woodworking is through the use of computer-aided design (CAD) software. This software allows woodworkers to create detailed plans and designs for their projects, which can then be easily shared with others. Additionally, some CAD software can even create 3D models of the final product, giving woodworkers a better idea of what the finished product will look like.

    Another way AI is affecting woodworking is through the use of robotic machinery. Robotics are able to automate many tasks that are traditionally done by hand, such as drilling, cutting, and sanding. This not only improves the speed and accuracy of these tasks, but also reduces the risk of injury for the woodworker. Some robotic systems are even able to learn from their mistakes and improve their performance over time.

    AI-powered technologies are also being used to improve safety in woodworking. For example, some machines are equipped with sensors that can detect when a human is too close to the machine and shut it down automatically. This can help prevent accidents and injuries in the workshop.

    Additionally, AI and machine learning can be used to optimize the production process, reduce material waste and increase efficiency. Moreover, AI-powered supply chain management and inventory optimization can help woodworking companies to improve their logistics and reduce costs

    Overall, AI is transforming the woodworking industry, making it more efficient, accurate and safe. Woodworkers are able to complete tasks more quickly, with less waste, and with fewer mistakes. As technology continues to advance, we can expect to see even more ways in which AI will change the way we work with wood.

    So You Wanna Start a Woodworking Business

    Alright, let’s talk about starting a woodworking business. Now, I ain’t no expert, but I know a thing or two about saws and sanders. And let me tell you, starting a woodworking business ain’t for the faint of heart. But if you got the passion and the skills, it can be one hell of a ride.

    First things first, you gotta have the skills. I’m talkin’ knowledge of different types of wood, tools, and techniques. If you ain’t got that, you gotta go out there and get it. Take some classes, workshops, whatever it takes. Because let me tell you, you don’t wanna be the guy who loses a finger on the job.

    Next, you gotta have a plan. And I ain’t talkin’ about just any plan, I’m talkin’ about a solid business plan. You gotta know who your target market is, what they want, and how you’re gonna get it to ’em. And don’t forget the financials, because let me tell you, starting a business ain’t cheap.

    Once you got your plan in place, you gotta get your business legally set up. That means registering, licenses, permits, all that boring stuff. But trust me, it’s gotta be done.

    Now we’re getting to the good stuff, the tools. You gotta invest in the right equipment, saws, drills, sanders, the works. And don’t skimp on quality, because let me tell you, cheap tools lead to cheap work.

    Now, you gotta show off your work, and I ain’t talkin’ about just putting up a few pictures on Instagram. You gotta build a portfolio, a website, whatever it takes. Show the world what you got.

    And finally, you gotta get out there and market your business. Network, attend trade shows, join professional organizations, and collaborate with other local businesses. And don’t be afraid to experiment and try new things, because let me tell you, woodworking is a constantly evolving art.

    Starting a woodworking business ain’t easy, but if you got the passion, skills, and a little bit of sawdust in your hair, you can make it happen. And who knows, you might just end up with a workshop full of unicorns.

    Let’s Talk about Woodworking Clamps!

    Are you ready to talk about something exciting? No, not folding laundry or on-line dating. I’m talking about woodworking clamps! These bad boys are the unsung heroes of almost every woodworking project. They bring material together and securely hold everything in place while the glue works its magic. If only they made clamps for marriages heading southbound, i wouldnt still be swimming in attorney fees. Anyhow, with so many different types of clamps out there, how do you know which one to choose? Don’t worry, I’m here to give you the lowdown on a few of the most popular woodworking clamps available and help you make a more informed decision than you did on prom night.

    36" Aluminum Bar Clamp Pony Jorgensen 3536 for woodworking
    Classic Bar Clamp

    First up, we have the classic Bar Clamp. These guys have been around for ages and for good reason. They’re versatile, durable, and get the job done. With a simple screw mechanism, you can adjust the clamp to any size and hold anything from small picture frames to large dining tables. They’re like the little black dress of clamps; they’ll never go out of style and will always be useful.

    H-Style woodworking Pipe Clamp with Crank Handle Pony Jorgensen
    Pipe Clamp

    Next, we have the Pipe Clamp. These clamps are similar to Bar Clamps but have a pipe running through the center, which allows for extra long clamping. These bad boys are perfect for those big projects where you need a little extra reach. You do need to supply your own bar but other than that they’re like the NBA player of clamps; tall, strong, and able to handle a lot of pressure.

    Pony Jorgensen 33418, 18" One Handed E-Z Hold Clamp, Throat Depth 3-1/3", Clamping Force 300 lb for woodworking
    One Handed E-Z Hold Clamp

    Then we have the One Handed E-Z Hold Clamp. They’re not only clamps, they’re also spreaders! You can use them to hold things in place and/or keep things apart, all while the glue dries.

    3" Protected Tip Classic woodworking Spring Clamp with 3" Reach Pony Jorgensen 3203-HT
    Classic Spring Clamp

    Last but not least, we have the Classic Spring Clamp . These clamps are old school and like a big chip clip. You can use them to hold things in place while you work or to clamp things together while the glue dries.. These are best for smaller projects or for precise work.

    So there you have it, folks! A brief rundown of all the different woodworking clamps available. Don’t be afraid to experiment and try out different clamps to find the one that best suits your needs and style. And remember, without a good clamp, you’re just a person holding pieces of wood together. Don’t be that person, be a clamp person. Happy clamping!

    Be sure to follow us on YouTube!

    How to Sand and Finish Your First Woodworking Project

    Man using an orbital sander on wood
    Man Hands using an orbital sander on wood

    Sanding and finishing are possibly the most important steps in any woodworking project, as they can help to smooth out rough surfaces, remove imperfections, and protect the wood from damage. For a beginner, this process can be very over whelming. Not to worry because In this blog post, I will walk you through the steps of sanding and finishing your first woodworking project, so you can achieve professional-looking results. (Fingers-Crossed)

    Step 1: Gather your materials

    Before you start sanding and finishing your project, make sure you have all the necessary materials. You will need:

    • Sandpaper: You will need a few different grits of sandpaper for different stages of sanding. For rough sanding, use a lower grit paper such as 80 grit. For medium sanding, use a medium grit paper such as 120 grit. For fine sanding or sanding of the finish coat, i like to use a higher grit paper around 320 grit.
    • An Orbital Sander and or a sanding block: A sanding block will help you apply even pressure and keep your sandpaper flat as you work. You can use a store-bought sanding block or make your own by wrapping sandpaper around a block of wood.
    • A dust mask: Sanding can create a lot of toxic wood dust, so it’s very important to protect your respiratory system by wearing a dust mask.
    • An air blower or a clean, dry cloth: You will need a clean, dry cloth to wipe away dust and debris as you work.

    Step 2: Sand your project

    Once you have gathered your materials, it’s time to start sanding your project. Begin by sanding with a low grit sandpaper (such as 80 grit) to remove any rough or uneven surfaces. Use long, even strokes if sanding by hand and apply moderate pressure. When you’re finished, wipe away the dust with a clean, dry cloth.

    Next, switch to a medium grit sandpaper (such as 120 grit) and repeat the process. This will help to smooth out any remaining rough spots and prepare the surface for finisheing. Again, be sure to wipe away the dust with a clean, dry cloth when you’re finished.

    Finally, depending on the project you can switch to a higher grit sandpaper (such as 150 grit) and give your project a final sanding. This will help to remove any swirls left by the sand paper.

    Step 3: Prepare the surface for finishing

    Before you apply a finish to your project, it’s important to make sure the surface is clean and free of dust and debris. Use a clean, dry cloth to wipe away any remaining dust and then allow the project to dry completely.

    Step 4: Apply the finish

    There are many different types of finishes you can use on your woodworking project, including oil, varnish, and polyurethane. Each type of finish has its own unique properties, so it’s important to choose the one that best suits your project. If this is your first ever project, i would highly reccomend and oil finish such as Tung oil. It is very forgiving and will not leave drips or sags thanks to the fact that the oil is absorbed into the wood.

    To apply the finish, follow the manufacturer’s instructions carefully. In general, you will want to start by applying a thin, even coat of tung oil onto your project. Let it dry and repeat!

    Step 5: Allow the finish to cure

    After you have applied the final coat of finish, it’s important to allow the finish to cure completely before using or handling your project. Curing times will vary depending on the type of finish you are using, so be sure to follow the manufacturer’s instructions for the specific product you are using.

    During the curing process, the finish will harden and become more durable. This is an important step, as it will help to protect your woodworking project from damage.

    Step 6: Sand and buff the finish

    Once the finish has cured, you can give your project a final sanding and buffing to remove any imperfections and create a smooth, professional-looking finish.

    To sand out the finish, use can use a higher grit sandpaper (such as 320- 400 grit) and apply light pressure. Wipe away the dust with a clean, dry cloth when you’re finished.

    ++Optional++To buff the finish, use a soft, lint-free cloth and apply a small amount of buffing compound. Rub the compound into the surface in a circular motion until the finish is smooth and shiny.

    Step 7: Enjoy your finished project!

    Congratulations! You have successfully sanded and finished your first woodworking project. Take a moment to appreciate your hard work and the beautiful finished product. With practice and patience, you will continue to improve your skills and create even more impressive projects in the future.

    I hope this blog has helped you understand the process of sanding and finishing a woodworking project. With these steps in mind, you will be well on your way to creating beautiful, professional-looking pieces that you can be proud of. For more Woodworking knowledge check out this video.