Cart:0 Items - $0.00
Order subtotal does not cover discounts and extra costs like shipping charges, etc. The final cost of the order will be calculated at the checkout page.
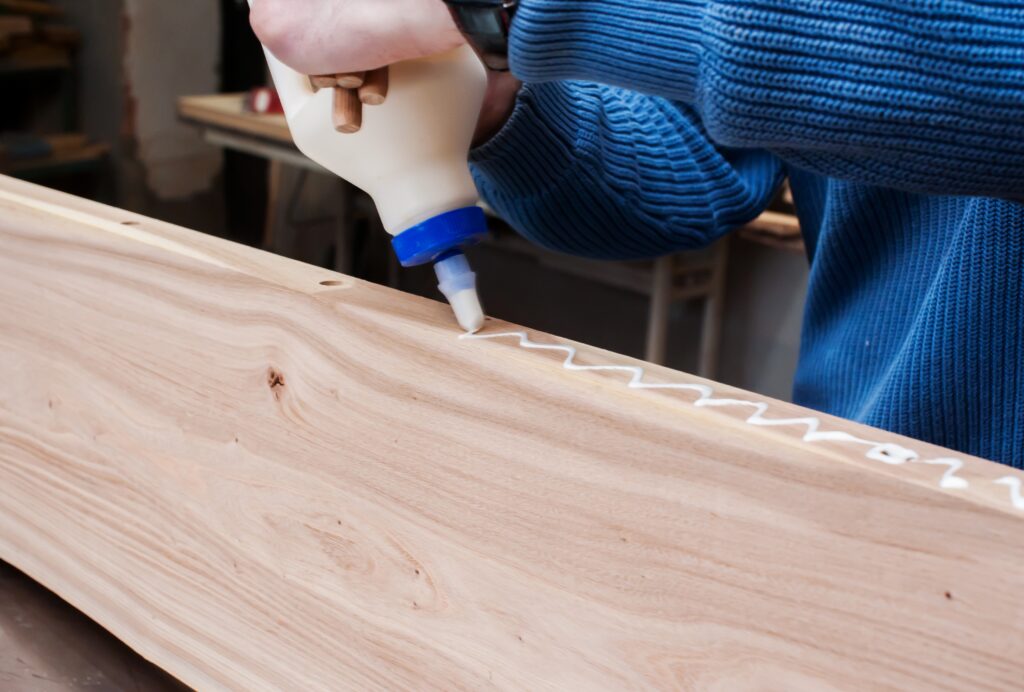
In woodworking, there’s always more than one way to skin a cat. With so many adhesives on the market, choosing the adhesive that will work for your project can be a difficult decision. So in this blog i will explain to you the adhesives that are commonly used in woodworking, each with their own unique properties and advantages. Each type of adhesive has its own unique properties and advantages, so it is important to choose the right one for the job.
Man applying glue to wood and gluing boards in carpentry workshop
Here are some of the most common types:
PVA (Polyvinyl Acetate) Glue: This is the most commonly used woodworking glue because of its ease of use, affordability, and versatility. PVA glue is a water-based adhesive that is easy to use and dries clear. It is particularly effective for joining porous materials, such as wood, and can be used on a variety of wood surfaces. PVA glue is also easy to sand once it has dried, making it ideal for projects that require a smooth finish. However, PVA glue is not waterproof and may not be suitable for outdoor projects
Epoxy: Epoxy is a two-part adhesive that provides a very strong bond. It consists of a resin and a hardener, which are mixed together before application. Epoxy can be used on a variety of surfaces, including wood, metal, and plastic, and is particularly useful for bonding wood to non-porous materials. Epoxy takes longer to cure than other adhesives, but it provides a very strong and durable bond that can withstand heavy loads and exposure to moisture.
Cyanoacrylate (CA) Glue: Also known as super glue, CA glue is a fast-drying adhesive that provides a strong bond. It is useful for small repairs and for bonding wood to non-porous materials, such as metal or plastic. CA glue dries clear and is ideal for projects where appearance is important. However, it is not effective for bonding porous materials, such as wood, as it tends to be brittle and can break easily.
Hide Glue: Hide glue is a natural adhesive that has been used in woodworking for centuries. It is made from animal collagen and is particularly useful for repairing antique furniture. Hide glue is reversible, meaning that it can be heated and reactivated if necessary. It is also great for use in veneering, as it provides a strong and stable bond. Hide glue has a longer working time than other adhesives.
Polyurethane Glue: Polyurethane glue is a very strong adhesive that provides a waterproof bond. It is particularly useful for outdoor woodworking projects or for bonding wood to non-porous materials.
Contact Cement: Contact cement is a strong adhesive that is particularly useful for laminating wood surfaces together. It is also useful for bonding wood to non-porous materials, such as metal or plastic.
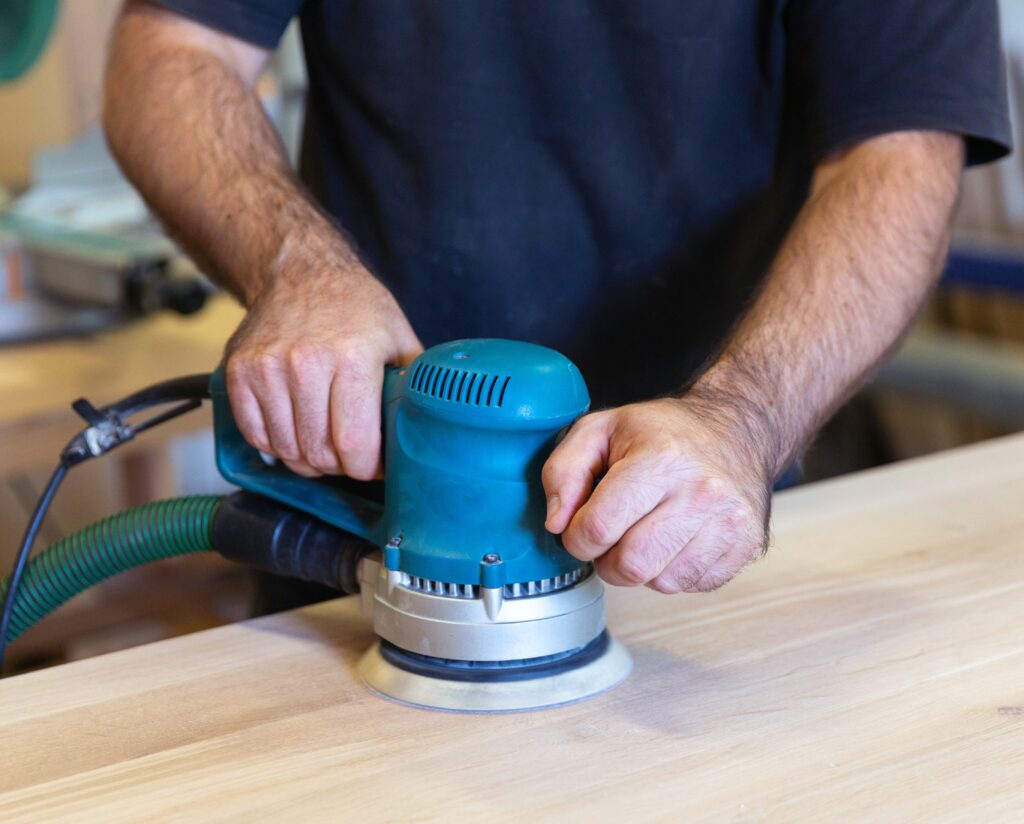
Sanding a wood surface with orbital sander in a workshop
The best sandpaper for woodworkers depends on the task at hand. Here are some general guidelines:
Grit: The grit of the sandpaper refers to the size of the abrasive particles on the paper. The higher the grit number, the finer the sandpaper. For most woodworking tasks, you’ll want to use a range of grits, from coarse to fine. For example, you might start with a 60-grit sandpaper to remove rough spots, then move to a 120-grit paper for smoothing, and finish with a 220-grit paper for a final sanding.
Type: There are two main types of sandpaper: open-coat and closed-coat. Open-coat sandpaper has larger gaps between the abrasive particles, which makes it less likely to clog with sawdust. This type of sandpaper is good for rough sanding tasks. Closed-coat sandpaper has a denser pattern of abrasive particles, which makes it better for fine sanding tasks.
Material: Sandpaper can be made from a variety of materials, including aluminum oxide, silicon carbide, and zirconia alumina. Aluminum oxide is the most common material and is suitable for most woodworking tasks. Silicon carbide is harder and more durable, making it better for sanding harder materials like metal or glass. Zirconia alumina is the most durable material and is best for heavy-duty sanding tasks.
In summary, the best sandpaper for woodworkers depends on the specific task at hand. It’s always a good idea to have a range of grits and types of sandpaper on hand to tackle different projects.
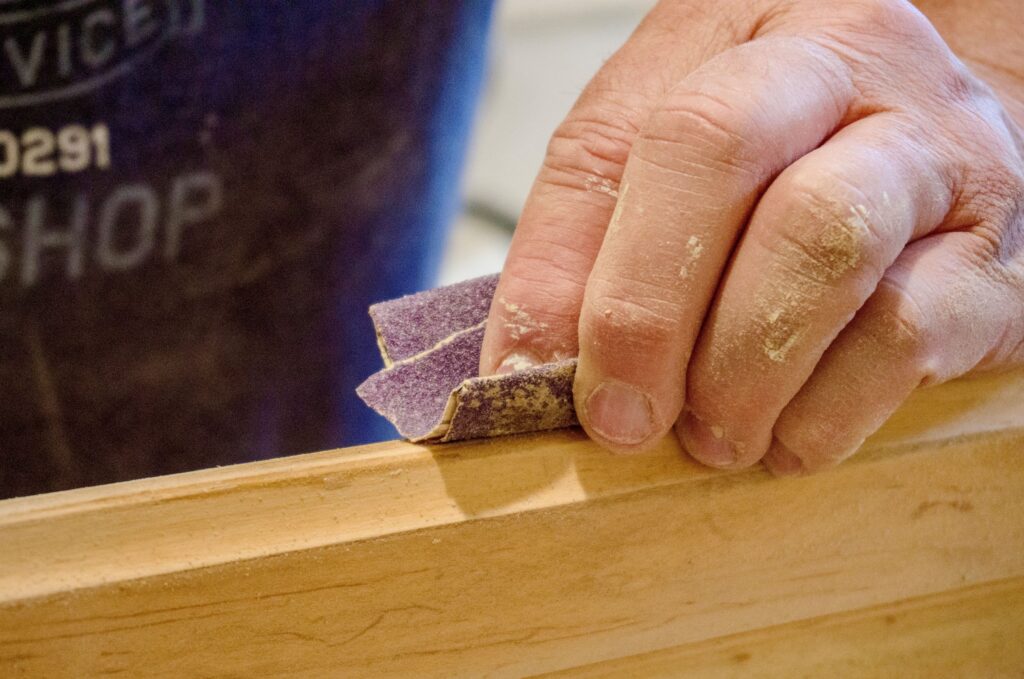
Sanding is an essential part of woodworking, as it helps to smooth out rough surfaces and prepare wood for staining, painting, or finishing. However, with so many different types of sandpaper available, it can be challenging to know which grits to use for each stage of sanding. In this blog, we’ll look at the three common sandpaper sanding grits used in woodworking and when to use them.
hand sanding wood
Coarse Grits (40-60 grit)
Coarse grits are typically used for the initial sanding of rough wood surfaces. They are the most abrasive type of sandpaper and are used to remove large amounts of material quickly. Coarse grits are also used to remove old paint or varnish from wood surfaces. The most common coarse grits are 40-60 grit sandpapers.
When using coarse grits, it’s essential to be careful not to over-sand the wood, as this can cause damage to the surface. It’s also important to sand with the grain of the wood to avoid creating scratches or gouges.
Medium Grits (80-120 grit)
Medium grits are the next step up from coarse grits and are typically used to smooth out rough surfaces after the initial sanding. Medium grits are less abrasive than coarse grits and are used to remove smaller imperfections in the wood surface. The most common medium grits are 80-120 grit sandpapers.
When using medium grits, it’s important to keep the sandpaper flat on the surface and to sand with the grain of the wood. Sanding against the grain can cause scratches and other damage to the wood surface.
Fine Grits (150-220 grit)
Fine grits are the least abrasive type of sandpaper and are used for the final sanding of wood surfaces. Fine grits are used to smooth out any remaining imperfections and to create a smooth, even surface for finishing.
Alright, let’s talk about starting a woodworking business. Now, I ain’t no expert, but I know a thing or two about saws and sanders. And let me tell you, starting a woodworking business ain’t for the faint of heart. But if you got the passion and the skills, it can be one hell of a ride.
First things first, you gotta have the skills. I’m talkin’ knowledge of different types of wood, tools, and techniques. If you ain’t got that, you gotta go out there and get it. Take some classes, workshops, whatever it takes. Because let me tell you, you don’t wanna be the guy who loses a finger on the job.
Next, you gotta have a plan. And I ain’t talkin’ about just any plan, I’m talkin’ about a solid business plan. You gotta know who your target market is, what they want, and how you’re gonna get it to ’em. And don’t forget the financials, because let me tell you, starting a business ain’t cheap.
Once you got your plan in place, you gotta get your business legally set up. That means registering, licenses, permits, all that boring stuff. But trust me, it’s gotta be done.
Now we’re getting to the good stuff, the tools. You gotta invest in the right equipment, saws, drills, sanders, the works. And don’t skimp on quality, because let me tell you, cheap tools lead to cheap work.
Now, you gotta show off your work, and I ain’t talkin’ about just putting up a few pictures on Instagram. You gotta build a portfolio, a website, whatever it takes. Show the world what you got.
And finally, you gotta get out there and market your business. Network, attend trade shows, join professional organizations, and collaborate with other local businesses. And don’t be afraid to experiment and try new things, because let me tell you, woodworking is a constantly evolving art.
Starting a woodworking business ain’t easy, but if you got the passion, skills, and a little bit of sawdust in your hair, you can make it happen. And who knows, you might just end up with a workshop full of unicorns.
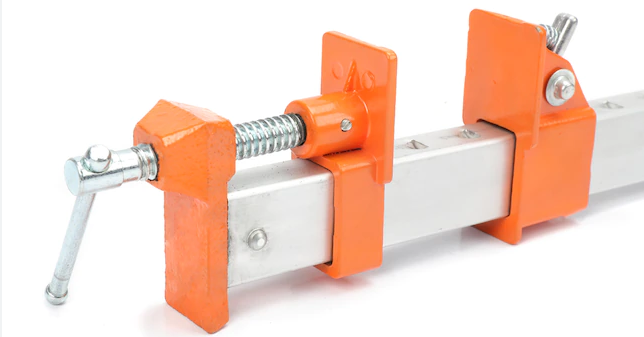
Are you ready to talk about something exciting? No, not folding laundry or on-line dating. I’m talking about woodworking clamps! These bad boys are the unsung heroes of almost every woodworking project. They bring material together and securely hold everything in place while the glue works its magic. If only they made clamps for marriages heading southbound, i wouldnt still be swimming in attorney fees. Anyhow, with so many different types of clamps out there, how do you know which one to choose? Don’t worry, I’m here to give you the lowdown on a few of the most popular woodworking clamps available and help you make a more informed decision than you did on prom night.
Classic Bar Clamp
First up, we have the classic Bar Clamp. These guys have been around for ages and for good reason. They’re versatile, durable, and get the job done. With a simple screw mechanism, you can adjust the clamp to any size and hold anything from small picture frames to large dining tables. They’re like the little black dress of clamps; they’ll never go out of style and will always be useful.
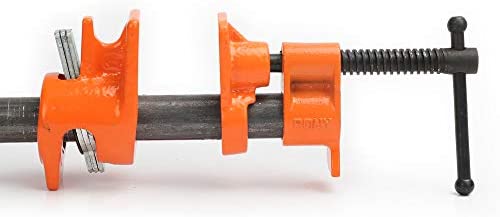
Pipe Clamp
Next, we have the Pipe Clamp. These clamps are similar to Bar Clamps but have a pipe running through the center, which allows for extra long clamping. These bad boys are perfect for those big projects where you need a little extra reach. You do need to supply your own bar but other than that they’re like the NBA player of clamps; tall, strong, and able to handle a lot of pressure.
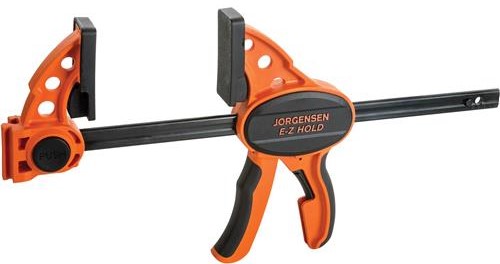
One Handed E-Z Hold Clamp
Then we have the One Handed E-Z Hold Clamp. They’re not only clamps, they’re also spreaders! You can use them to hold things in place and/or keep things apart, all while the glue dries.
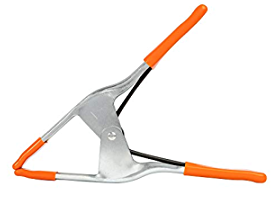
Classic Spring Clamp
Last but not least, we have the Classic Spring Clamp . These clamps are old school and like a big chip clip. You can use them to hold things in place while you work or to clamp things together while the glue dries.. These are best for smaller projects or for precise work.
So there you have it, folks! A brief rundown of all the different woodworking clamps available. Don’t be afraid to experiment and try out different clamps to find the one that best suits your needs and style. And remember, without a good clamp, you’re just a person holding pieces of wood together. Don’t be that person, be a clamp person. Happy clamping!
Kreg pocket holes are a popular tool in woodworking when its time to join two pieces of wood together securely. These pocket holes offer many advantages. Pocket holes are created using a specialized drill bit and jig system that makes a small, angled hole in one piece of wood and a matching pocket in the other. The woodworker then inserts a self-tapping screw, designed for pocket holes, through the pocket and into the hole, effectively joining the two pieces together.
Kreg Pocket Hole Jig and Stepped Drill Bit
One of the main advantages of using Kreg pocket holes is their simplicity. The process of creating the holes and joining the wood is quick and straightforward, making them a popular choice for both professionals and DIY enthusiasts. In addition, Kreg pocket holes are very strong and resistant to movement, making them ideal for use in applications where the joint may be subjected to stress or vibration.
The versatility of Kreg pocket holes is another major advantage. These holes can be used to join two pieces of wood together at any angle, making them useful for creating frames, cabinets, and other structures. They can also be used to join thicker pieces of wood together, such as when creating a tabletop or other large surface.
While Kreg pocket holes are easy to use and versatile, they also offer the added benefit of being easy to hide. The holes and screws can be covered with a specially designed wood plug or even wood filler and sanded smooth. This feature makes Kreg pocket holes ideal for use in applications where a visible fastener is not desired.
In conclusion, Kreg pocket holes are a valuable tool for woodworkers. They offer a simple, strong, and easy-to-hide way to join two pieces of wood together, making them useful in a wide range of applications. Whether you’re a professional woodworker or a DIY enthusiast, Kreg pocket holes are a tool worth considering for your toolkit.
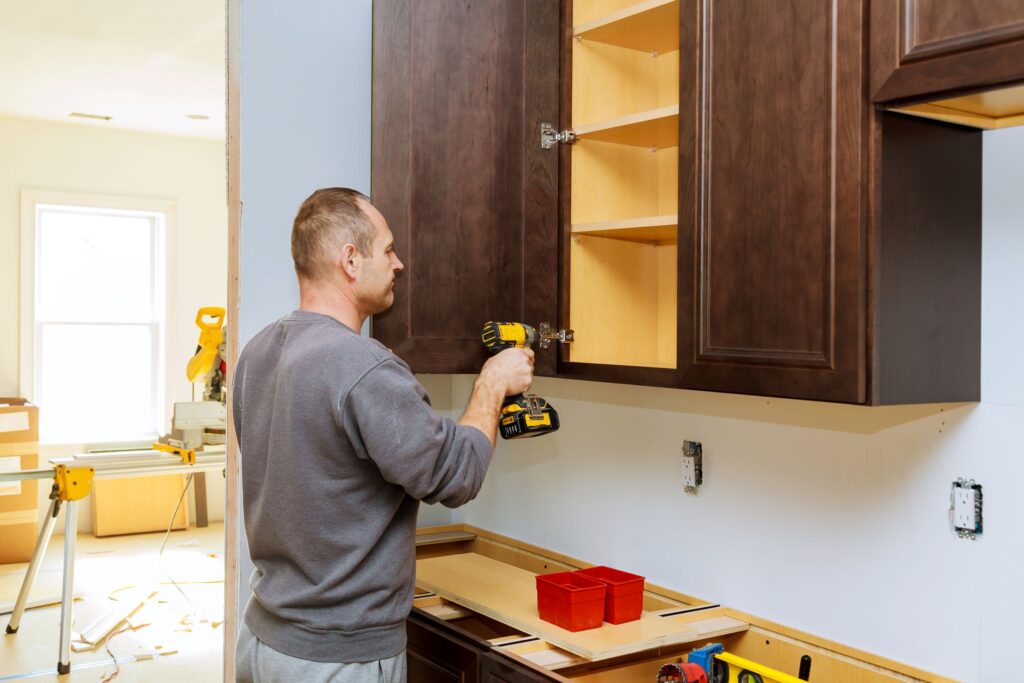
The cost of a kitchen remodel can vary greatly depending on a number of factors, including the size of the kitchen, the extent of the renovations, and the materials and appliances you choose. On average, homeowners can expect to pay between $12,000 and $33,000 for a full kitchen remodel.
To get a more accurate estimate of what your kitchen remodel might cost, it’s important to consider the following factors:
Size of the kitchen: A larger kitchen will naturally cost more to remodel than a smaller one.
Extent of the renovations: Are you just updating the cabinets and countertops, or are you tearing down walls to create an open floor plan? The more extensive the renovations, the higher the cost will be.
Materials and appliances: The cost of materials like countertops, cabinets, and appliances can vary greatly. Higher-end materials and appliances will naturally cost more, but they may also have a longer lifespan and add more value to your home. Woodworker Express offers a wide variety of cabinet parts such as lazy susans, blind corner units, and so much more that will help save you money. This allows you to save money and purcahse less expensive stock cabinets. You can then purchase the upgrades for your new kitchen cabniets directly from us and even install them yourself! (Take a look at the video below for more info)
Labor costs: The cost of labor can vary depending on where you live and the complexity of the renovations. It’s important to get estimates from multiple contractors to ensure you’re getting a fair price.
It’s also important to remember that a kitchen remodel is a significant investment, so it’s worth taking the time to carefully plan and budget for the project. It may be helpful to consult with a kitchen design professional or contractor to get a more accurate estimate and to help you make informed decisions about materials and design choices.
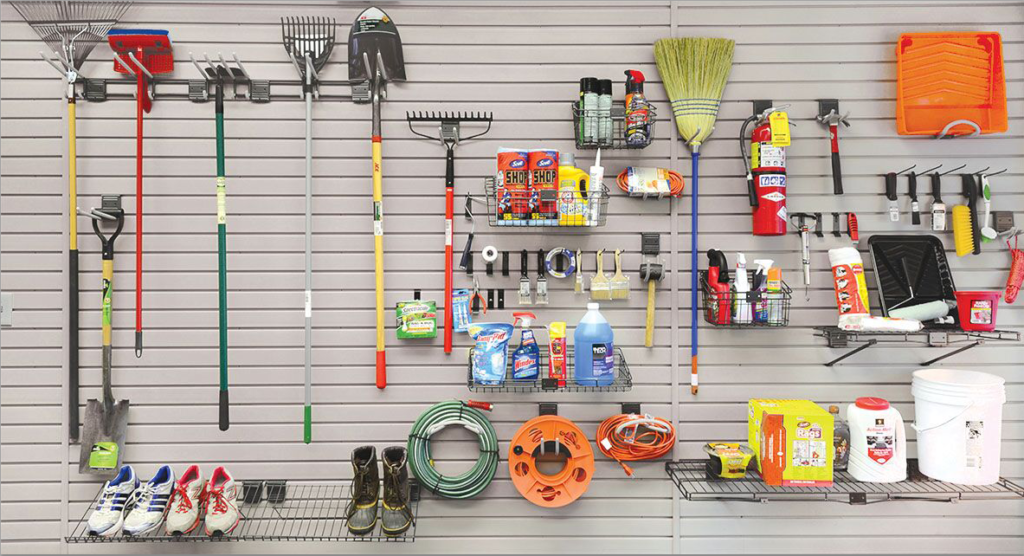
I wouldn’t know what to do with 3/4 of the items attached to the slatwall on display here. As a townhome owner/occupier (and monthly assessment donor), I consider myself fortunate enough to not have to do (m)any exterior yard chores or snow shoveling as part of my habitation duties. It’s a beautiful thing, as it suits my preferred lifestyle quite well. It also opens up free time for hobbies on the weekends (like Soap Carving, or Competitive Duck Herding) when you’re not bogged down doing exterior home maintenance and groundskeeping.
However, for those in the majority, I’d be remiss to not introduce the HandiWall® PVC Slatwall Organization System from HandiSolutions®. This system is essentially a Swiss Army knife-like configuration to keep your garage/hobby room organized and in top form. A house/garage is not a home without these comprehensive storage ‘staples’. And, for the approach, there’s some general ‘rack’ type of supports, which are super flexible for those types of tools that you tend to hang when you store them…I’m thinking: shovel, rake, hoe, broom….pool cue! No real need to go ‘general’ unless you choose to because HandiSolutions® has an exhaustive amount of super specialized hangers/hooks/shelves/tool racks/bags/bins/baskets/etc. to choose from when outfitting that PVC HandiWall® of yours. Spouse-permitting, you might even be able to outfit your kitchen pantry with some of the accessories shown here…you’ve just gotta use your imagination. That said, don’t blame me if your spouse doesn’t quite see eye-to-eye with you on the idea of installing HandiWall® Slatwall Organization into your kitchen pantry….and don’t feel bad; there’s always the garage or your hobby room.
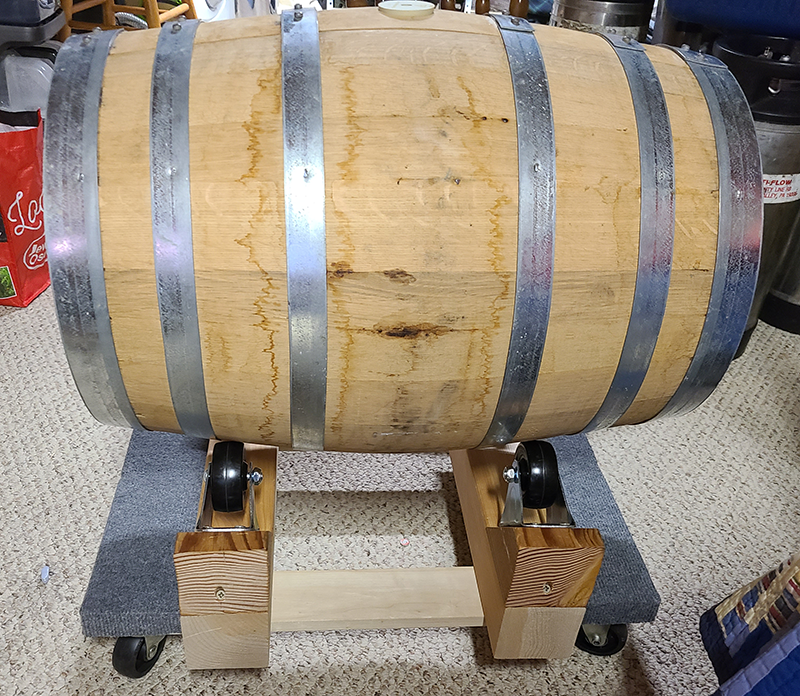
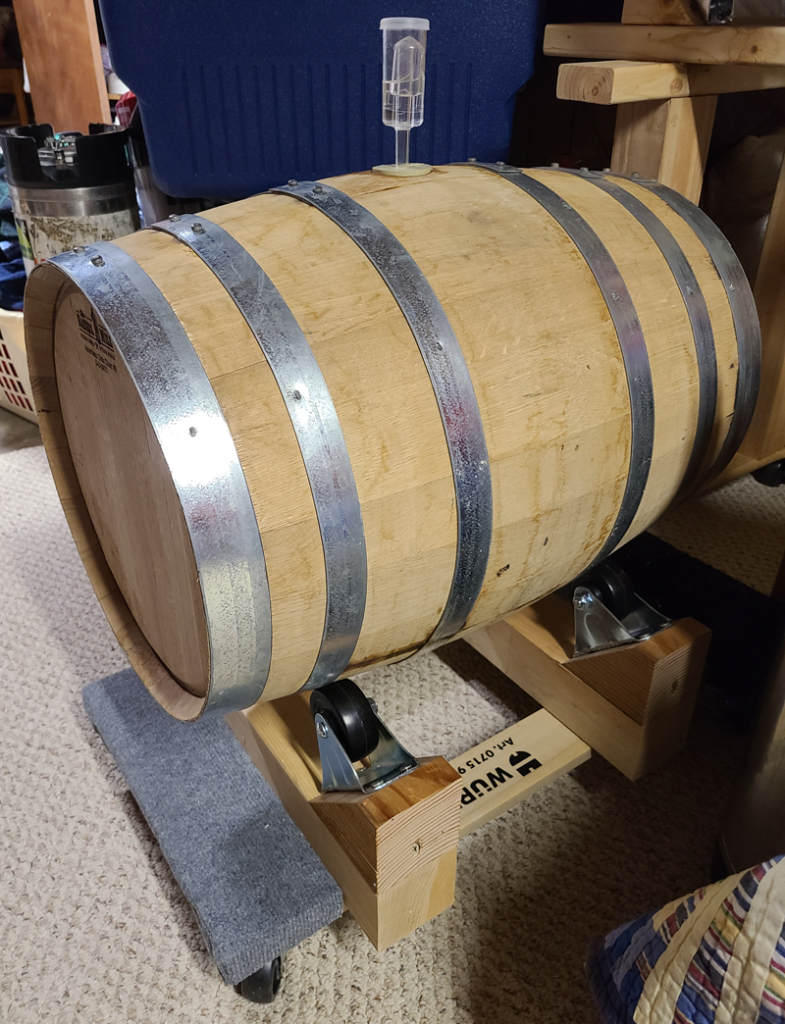
When barrel-aging homebrewed beverages at home, it’s always important to be able to move your barrel around once it’s filled. Whether your beverage is beer, wine, cider, or mead, once you fill the barrel, it’s heavy stuff and not easy to move. Building a Rolling Barrel Stand can make your life easier by putting your filled barrel on wheels.
Finished Rolling Barrel Stand with 15-Gallon Barrel
Building a Rolling Barrel Stand doesn’t have to be a difficult project and, with the right parts and tools, you can build it quickly and make it strong enough to support the extra weight that comes from a filled barrel.
The Rolling Barrel Stand in this Do-It-Yourself project keeps your barrel fairly low to the ground but high enough to make it easier to move and work with the contents. It also sits on wheels facing upwards so you can gently roll the barrel contents whenever you need to mix things up a bit.
Our project is designed to hold a 15-gallon barrel and the project is constructed on top of a rolling dolly that supports up to 1000 lbs. (The 1000 lb. capacity is overkill for this project but efficient in that the dolly half of the project comes already assembled when you purchase it). We attach additional supports to raise the barrel up and provide more stability. The intention of our additional supports is to provide added stability and focus the weight of the barrel straight down through the center, and strongest part, of our rolling barrel stand.
Getting Technical: Barrel and Fluid Weight Math
Before we start a project like this, we need to make sure the parts we are putting together can support the weight of the materials we are putting on top of it. Our finished Rolling Barrel Stand needs to support the 15-gallon barrel and its contents without falling apart.
We know from picking up an empty 15-gallon wooden barrel that it can weigh roughly 30 – 40 lbs. (this is purely a guestimate from me picking up a barrel from my last project. While my guesstimate may be off, the structure we’ll build here should be more than enough to support our filled barrel. This number is provided to support the math below. Weigh your own empty barrel to get a more precise measurement.)
Water, by itself, weighs 8.33 lbs. per gallon and brewed beverages are made up mostly of water.
A 15-gallon barrel holds about 15 gallons of volume but some can hold as much as 16-17 gallons depending on the barrel maker. If we take the worst case scenario and say our barrel holds 17 gallons, we can then say, roughly, that…
17 gallons of fluid in the barrel x 8.33 lbs. / gal = 141.6 lbs of liquid will be stored in the barrel
Note: I used 2-1/2″ casters for this project. If you change the casters size, make sure to adjust your measurements in or out depending on the size of the casters. For example, if you use a 3″ caster instead of the 2-1/2″ caster, that is 1/2″ more in size times 2 casters giving you 1″ to adjust. Therefore, you would have to adjust your main support pieces to be 1″ larger to accommodate the extra inch… 21-1/2″ L instead of 20-1/2′ L and vice versa if your casters were smaller than 2-1/2″.
(optional) Scrap piece of wood for support in assembly step
(optional) Step drill bit or countersink drill bit for more finished look when attaching angled blocks
Materials Preparation
Note: I have built this Rolling Barrel Stand project two different ways and modeled the measurements and calculations for this project from those projects. You may adjust these measurements for your own design but, my measurements are provided now as a guide and starting point.
Our 15-gallon barrel is about 16″ wide at the point it makes contact with the rollers of the finished project. We want our barrel raised a bit higher to make it easy to roll and support strongly.
Cut two (2) 20-1/2″ L main support pieces from the 4×4 wood
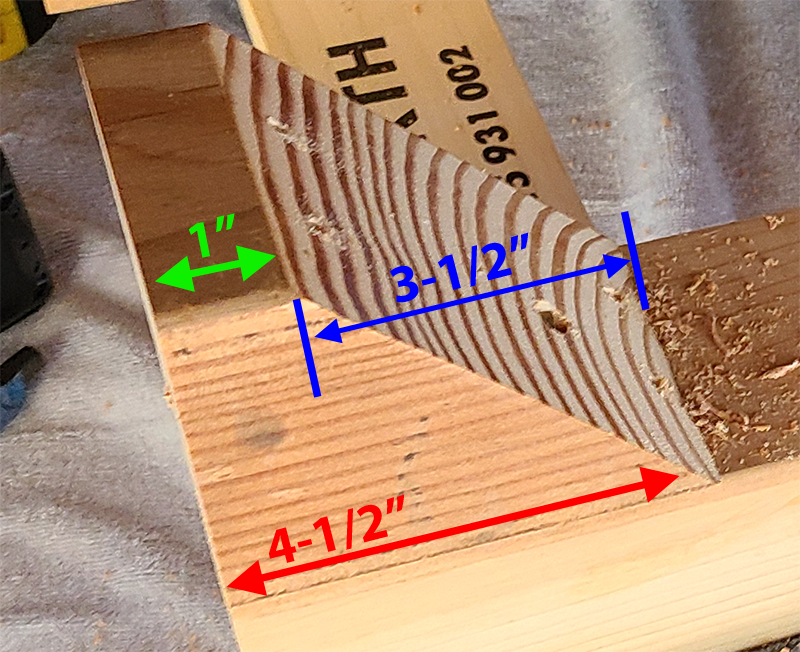
From the same 4×4 piece of wood, cut four (4) 4-1/2″ L pieces that are 3-1/2″ at a 45° angle with an additional inch of length remaining (see illustration below).
Sizing of the end blocks the casters are mounted to
Assembly of the Rolling Barrel Stand
The support pieces, angled blocks, and casters are assembled together to form a cradle for your barrel that allows you to rock your barrel for various mixing functions.
1. Mount the support pieces to the dolly: The two main support pieces are mounted across the dolly inside the carpeted end pieces of the dolly. Center the first support piece across the dolly on the inside of the dolly’s open space pressing the support piece tightly against the carpeted end piece of the dolly. Secure it with clamps or have a friend hold this piece steady. Flip the dolly over, pre-drill 2-3 holes through the dolly and support piece on each side and then drive 3-1/2″ screws through the bottom of the dolly and into the 20-1/2″ support pieces. Repeat with the 2nd support piece on the other side of the dolly against the carpeted end. Flip the dolly back over.
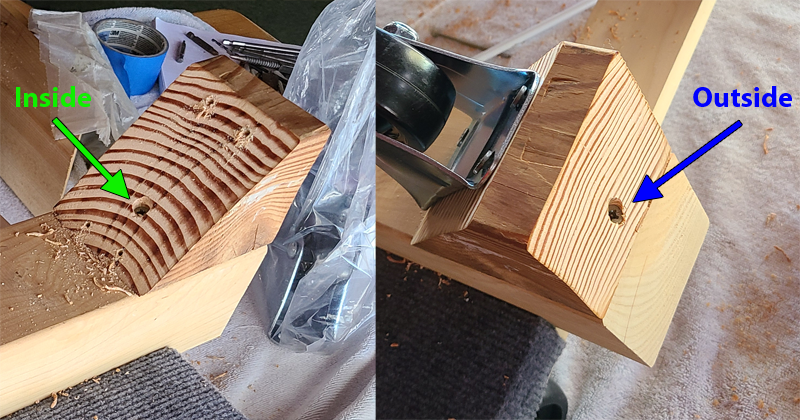
2. Mount the angled blocks: These pieces are mounted to our support pieces and then the upward facing casters are mounted to them. The extra inch of space is added to the blocks to support the screw lengths used in this project. Mount your angled blocks to the support pieces with the angled ends facing inward. Secure blocks with 3-1/2″ screws. Be sure to secure the blocks to the supports along the center lines so as not to interfere with the placement and mounting of the casters in the next step. Also, for a clean look, try to keep the angled pieces flush to the outside of your support pieces when mounting. (I had a friend hold a scrap piece of wood flat against the outside of the support piece while I pushed my angled piece up against that scrap wood and then I secured it.)
We know our support piece is 20-1/2″ L and the angled piece of wood is 4-1/2″ L and we use one angled piece on each side of our support piece… so, 4-1/2″ + 4-1/2″ = 9″ leaving us with 11-1/2″ on the inside from one lower end of the angle to the next. (See Angled Blocks Illustration A)
Be sure to secure the angled blocks on the inside of the support piece and on the outside. Screw through the pieces into the support pieces. Use a step drill bit or countersink drill bit if you want a more finished look. (See Angled Blocks Illustration B)
Angled Blocks Illustration A – Distance between angled blocksAngled Blocks Illustration B – Securing points for angled blocks
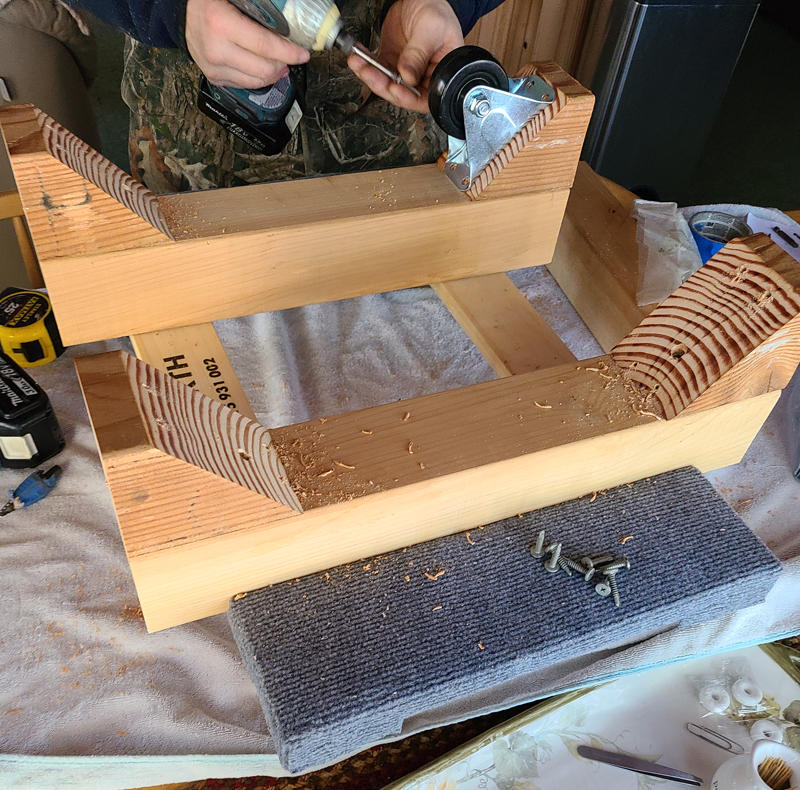
3. Mount the casters to the angled blocks: The last step is to mount the casters to the angled blocks. Place a caster on the angled block resting the bottom against the support piece. Mark and pre-drill the four holes for the caster. Then, attach the caster to the angled blocks with the 1″ screws (add washers if you don’t have wide enough heads on your screws to cover the holes). Repeat for all 4 casters.
Mounting the casters
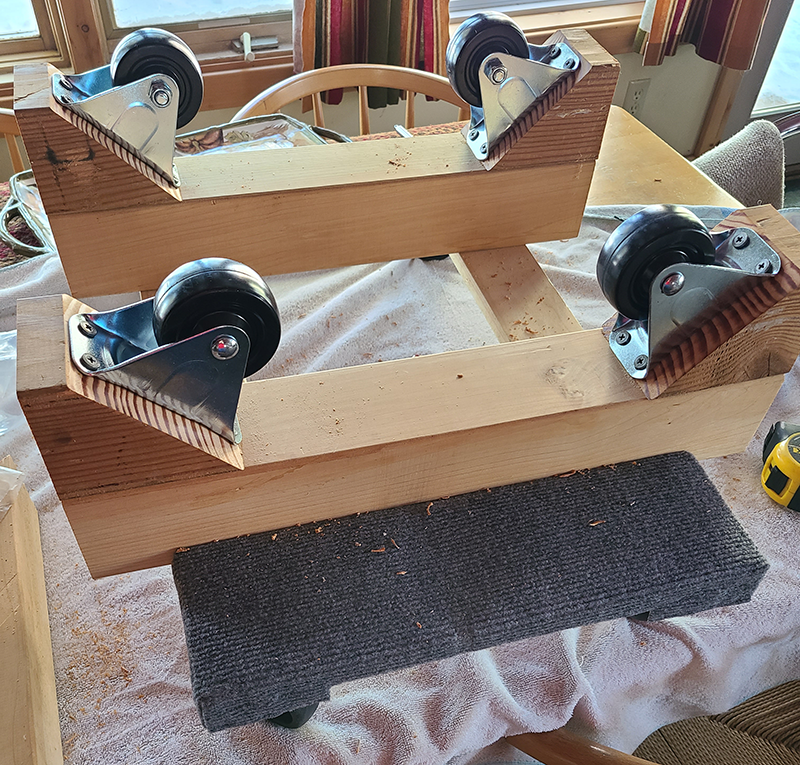
After all of the casters have been secured, your Rolling Barrel Stand is ready to be used to hold your barrel.
Completely Assembled ProjectSide view of Barrel sitting on CastersRolling Barrel Stand project with Full Barrel on top
______________________
Kevin Wojdak has been a homebrewer since 2008 and, like most homebrewers, builds equipment he needs to support the hobby. He is also the Communications Officer for the Urban Knaves of Grain (UKG) Homebrew Club, DuPage County, Illinois and a member of the Technical Team for the Drunk Monk Challenge Homebrew Competition taking place annually in March.
Looking for a place to show off your coffee mugs? With a little DIY and by recycling wood from a pallet, we can make a really nice Coffee Mug Holder! Continue reading →


 Do Not Sell My Personal Information